STEP 7.Taking photos and instant printing

  • 1.

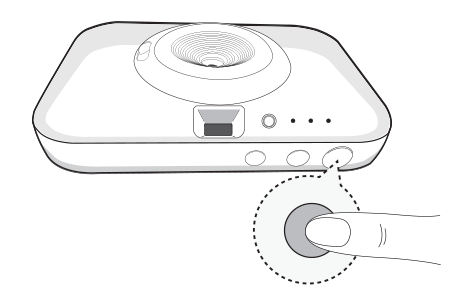
    Press (power) button for 2 seconds to turn on.
  • 2.

    Open the lens cover by lowering the lens cover switch.

    Note

    • If the lens cover is closed, you can’t take a photo.
  • 3.

    Hold the Pocket photo, confirm the desired composition of the final image by using view finder. (It is recommended that you use the viewfinder eyepiece within 10 mm.)

    Optimal distance for taking photo is approximately between 0.5 m and 1.5m. The subject may shake when taking pictures. Hold your elbows at your body when taking photos.
    • 1.View finder
    • 2.Print(Reprint) button
    • 3.Shutter
  • 4.

    To take a photo, press Shutter button for 2 seconds. Then the Pocket photo prints a photo you took with a shutter sound.
    ※ The flash may turn on at dark place when taking photos.
  • 5.

    If you want to print a photo you took again, press [Print] (Reprint) button 1 seconds or more on the top of Pocket photo.

Note on taking photo

  • Be careful not to touch the lens surface when you take the photo.
  • Use a blower, cotton bud and soft cloth to remove dirt on the lens or view finder.
  • Do not interrupt the flash, lens or paper exit slot with finger or strap.
  • Do not take the photos where flash photography is forbidden.
  • Do not look through the view finder at the sun or other strong light.
  • Close the lens cover when you are not in use the Pocket photo to protect the lens.
  • Do not leave the view finder in places exposed to strong sunlight. Personal injury or fire could result if the lens should accidentally concentrate the sunbeams on an object or a person.accidentally concentrate the sunbeams on an object or a person.

Note

  • Photos can be reprinted only last shot of camera or last printed image with app. You can not use reprint function when the power is turned off or reset.
  • During printing, the photo paper repeatedly comes out and in about 5 times through the ejection port. Please wait and do not pull out the photo by hand until it is finally released.
  • The flash has an effective range of between 0.7 m and 1.8 m.
  • The subject will be out of focus if the distance is less than 0.5 m.
  • Keep your eyes close to the viewfinder when taking photos.
  • When shooting with the camera the shooting range of images viewed with the viewfinder and the images printed after shooting may differ.
  • The quality of the photos printed with the camera and the photos printed with the Pocket Photo app may be different.

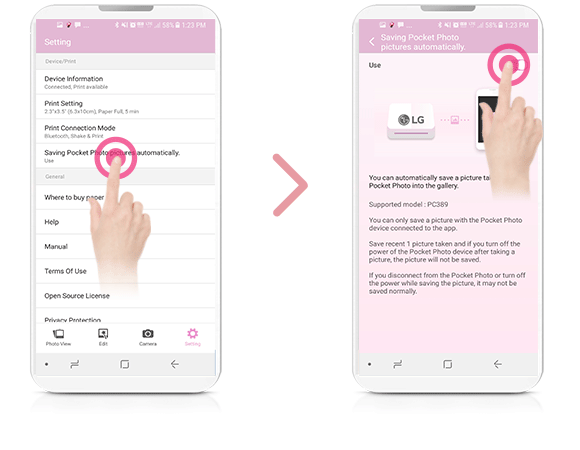
Saving phto automatically to smartphone (Android only)

    Photo taken with Pocket Photo can be automatically saved on your smartphone

  • 1.

    Please connect Pocket Photo and Smartphone by using Bluetooth.
  • 2.

    Run the Pocket Photo App and then, touch [Saving Pocket Photo pictures automatically.] on the [ Setting]. Then set to [On].
  • 3.

    When you take a photo, photo is saved automatically on connected smartphone.
  • 4.

    If the photo is not saved automatically, select the [led] button on the photo view screen of the Pocket Photo app.
  • 5.

    The [Saving Pocket Photo pictures] pop-up window appears. If you select [Save], photo is saved automatically to the connected smartphone.

Note

  • You can use saving photo automatically function only when your Pocket Photo and Smartphone are connected via Bluetooth.
  • Only the last photo taken with Pocket Photo is saved.
  • Photo will not be saved when the power is turned off.
  • Photo may not be saved normally if the connection to the smartphone is disconneted or the power is turned off while saving photo.
  • When shooting with the camera the shooting range of images viewed with the viewfinder and the images printed after shooting may differ.
  • The quality of the photos printed with the camera and the photos printed with the Pocket Photo app may be different.
  • Saving photo automatically function supporting version

    -App version v3.1.8 or higher

    -Firmware v4.2.2 or higher

Printing black-and-white photo

If you switch your pocket photo to black-and-white shooting mode, you can print the photo in black and white when taking photos.

  • 1.

    Press (power) button to turn on.
  • 2.

    Close the lens cover by raising the lens cover switch.
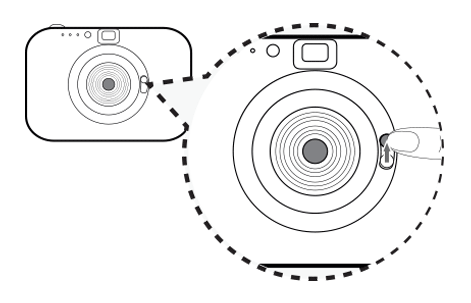
  • Caution

    • You can not switch to black-and-white shooting mode, If do not have a photo cartridge in pocket photo. And you can not switch to black-and-white shooting mode while printing.
    • You can not switch to black-and-white shooting mode, If error occurs in pocket photo.
    • When Pocket Photo is turned off and on, the black-and-white shooting mode is maintained.
  • 3.

    Press Shutter button for 5 seconds. The led will light up in white and switch to black-and-white shooting mode.
  • 4.

    Open the lens cover by lowering the lens cover switch.
  • 5.

    When you take a photo, black and white photos are printed through Pocket Photo.
  • 6.

    When you change to the color shooting mode, close the lens cover by raising the lens cover switch, and then press the shutter button for 5 seconds.
    led LED turns off and changes to color mode.
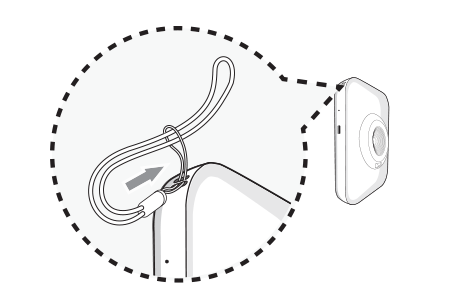
Note

  • When printing via the Pocket Photo app, the camera prints in color even if it is set to black-and-white shooting mode.
  • Black-and-white shooting mode is operated even when the pocket photo is turned off and on after switching to black-and-white shooting mode.

Using a strap

Wind(Attach) the strap as follow the photo to prevent dropping the Pocket photo when you carry the Pocket photo or take a photo.

Note

  • Wind the strap on your wrist, do not around your neck.
  • Use caution not to block paper exit slot with the strap.
  • It is recommended to use the supplied strap only.